How to Add Search to Your Headless Hashnode Blog with Supabase Text Search and Next.js 14
Table of contents
In this blog, you are going to get your blog posts from the Hashnode API (Application Programming Interface), pass them to a Supabase database then add the ability to do full text search against your saved posts.
Prerequisites
You will need the following to better follow along with this blog:
Basic programming skills
A text editor like VSCode or an IDE (Integrated Development Environment)
This blog assumes you have a Hashnode blog set up and starts from there.
Set up GraphQL Apollo Client and Hashnode Endpoint
In your src folder, create a folder called queries and create within it a file gql.ts. Paste the following within it:
import { ApolloClient, gql, HttpLink, InMemoryCache } from "@apollo/client";
import { registerApolloClient } from "@apollo/experimental-nextjs-app-support/rsc";

export const { getClient } = registerApolloClient(() => {
    return new ApolloClient({
        cache: new InMemoryCache(),
        link: new HttpLink({
            uri: "https://gql.hashnode.com",
        }),
    });
});

export const getBlogsQuery = gql`
    {
        publication(host: "your-url") {
            posts(first: 20) {
                edges {
                    node {
                        coverImage {
                            url
                        }
                        title
                        subtitle
                        brief
                        slug
                        content {
                            html
                            markdown
                        }
                    }
                }
            }
        }
    }
`;
This sets up Apollo client to work with Next.js app router, defines the query to make and exports both.
Open an integrated terminal and run npm install to install the dependencies needed.
Set up Supabase Config and Database
Create a Supabase project if you don't have one. Create a new database table give it a name. Add columns corresponding to the information gotten from Hashnode API. Add hashnode_id, title, subtitle, brief, slug, url, html, and markdown as columns, they are all type text and leave Row Level Security off.
In your Next.js app, create a folder in src called lib, create two files within it to export a Supabase server and client instance. This is because Next.js app router is by default server-first but the search will be implemented client side.
The server instance file will look as below:
import { createClient } from "@supabase/supabase-js";

export const supabaseServerClient = createClient(
    process.env.NEXT_PUBLIC_SUPABASE_URL!,
    process.env.SUPABASE_SERVICE_ROLE_KEY!
);
And the client instance will look as below:
import { createClient } from "@supabase/supabase-js";

export const supabaseClient = createClient(
    process.env.NEXT_PUBLIC_SUPABASE_URL!,
    process.env.NEXT_PUBLIC_SUPABASE_ANON_KEY!
);
The difference between them being that service key is exposed in the SupabaseServerClient instance and hidden in the client one. You will need to run npm install in an integrated terminal again to get the Supabase dependency.
Create an .env file at the root of the application and paste your credentials in it. You can get the values from the Supabase dashboard. Your .env file should look like this:
NEXT_PUBLIC_SUPABASE_URL=<your-supabase-project-public-url>
NEXT_PUBLIC_SUPABASE_ANON_KEY=<your-supabase-project-anon-key>
SUPABASE_SERVICE_ROLE_KEY=<your-supabase-project-service-key>
Get and Display the Blogs
In the app folder, create a page.tsx file and scaffold a react component. This is what mine looks like:
const Page = async () => {
const {
data: {
publication: {
posts: { edges },
},
},
} = await getClient().query({ query: getBlogsQuery });
console.log(edges[4].node.title);
return (
<div className="top-styles my-14">
<h5 className="tagline"> BLOG POSTS </h5>
<h1 className="headline mb-8">
Thoughts on the tech I'm using, learning and loving{" "}
</h1>
<div className="card-section w-8/12">
{edges.map(({ node }: { node: IBlog }, index: number) => (
<Card key={index} cardInfo={node} />
))}
</div>
</div>
);
};
export default Page;
This makes a request to the Hashnode endpoint, returns the data then the data is displayed in a Card component. Here is what my Card component looks:
"use client";
import React from "react";
import Image from "next/image";
import Link from "next/link";
import { IBlog } from "../types";

function Card({
    cardInfo,
    isInDialog,
}: {
    cardInfo: IBlog;
    isInDialog?: boolean;
}) {
    return (
        <Link
            className="card flex flex-col mb-6 justify-between"
            href={`https://<Your-site-url-or-subdomain>/${cardInfo.slug}`}
            target="_blank"
        >
            {!isInDialog ? (
                <div className="h-48">
                    <Image
                        src={isInDialog ? "" : cardInfo!.coverImage?.url}
                        alt="screenshot"
                        width="200"
                        height="200"
                        className="h-full w-full object-cover rounded-md"
                    />
                </div>
            ) : null}

            <h2 className="text-2xl my-4 text-gray-200 font-extrabold">
                {cardInfo!.title}
            </h2>
            <p className="mt-2 mb-4 overflow-auto">
                {cardInfo!.brief?.substring(0, 120) + "..."}
            </p>
            <span className="text-yellow-400 font-semibold hover:scale-110 self-end">
                Read More
            </span>
        </Link>
    );
}

export default Card;
Create a types.ts file in src folder to describe the shape of the blog like so:
export interface IBlog {
    id: string;
    title: string;
    brief: string;
    slug: string;
    subtitle: string;
    coverImage: {
        url: string;
    };
    content: {
        html: string;
        markdown: string;
    };
}
Populate Supabase Table with Hashnode Blogs
To implement search, you will need to load all initial blogs from your Hashnode blog onto the Supabase table.
Create a file in the src folder and name it populateBlogs.ts. This will contain some logic that will run as a script. Paste the following in it:
require("dotenv").config();
import { ApolloClient, InMemoryCache, HttpLink, gql } from "@apollo/client";
import { supabaseServerClient } from "./lib/supabase";
import { IBlog } from "./types";

export async function populateBlogs() {
    const {
        data: {
            publication: {
                posts: { edges },
            },
        },
    } = await client.query({ query: getBlogsQuery });

    const { data: blogs, error: fetchError } = await supabaseServerClient
        .from("blogs")
        .select("id")
        .limit(1);

    if (fetchError) {
        console.error(
            "Error checking if from supabase blogs table is populated",
            fetchError.hint
        );
        return;
    }

    if (blogs.length > 0) {
        console.log("Blogs table is not empty, skipping population");
        return;
    }

    edges.forEach(async ({ node }: { node: IBlog }) => {
        const {
            id,
            title,
            subtitle,
            brief,
            slug,
            content: { html, markdown },
            coverImage: { url },
        } = node;

        const { data, error: insertError } = await supabaseServerClient
            .from("blogs")
            .insert({
                hashnode_id: id,
                title,
                subtitle,
                brief,
                slug,
                html,
                markdown,
                url,
            });

        if (insertError) {
            console.error(
                "Error adding hashnode blogs to supabase",
                insertError.hint
            );
            return;
        }

        console.log("Hashnode blogs added to supabase table", data);
        return data;
    });
}
populateBlogs().catch(console.error);
Now instantiate the client and create the query in the same file. Paste the following below the import statements:
const client = new ApolloClient({
    cache: new InMemoryCache(),
    link: new HttpLink({
        uri: "https://gql.hashnode.com",
    }),
});

const getBlogsQuery = gql`
    {
        publication(host: "blog.hijabicoder.dev") {
            posts(first: 20) {
                edges {
                    node {
                        id
                        coverImage {
                            url
                        }
                        title
                        subtitle
                        brief
                        slug
                        content {
                            html
                            markdown
                        }
                    }
                }
            }
        }
    }
`;
// rest of code remains unchanged
Run npm install to get any missing dependency, then add the following to your package.json file:
"scripts": {
    //add below the last entry in the scripts key
    "populateBlogs": "ts-node --compiler-options \"{\\\"module\\\":\\\"commonjs\\\"}\" src/populateBlogs.ts"
  },
// rest of the file remains unchanged
This adds a script that will execute the code in the populateBlogs.ts file. Run npm i ts-node in an integrated terminal then run npm run populateBlogs in the same terminal window.
This will execute the script and you should see your blogs in the Supabase dashboard.
Add Search Functionality
Now that the blogs are available in the Supabase table, create a components folder in the src folder and add a file called search.tsx to hold the search logic. Mark this file as a client component and paste the following into it:
"use client";
import React, { FormEvent, useState } from "react";
import Card from "./Card";
import Dialog from "./Dialog";
import { IBlog } from "@/types";
import { searchSupabase } from "@/queries/supabase";

const Search = () => {
    const [searchTerm, setSearchTerm] = useState("");
    const [isSearching, setIsSearching] = useState(false);
    const [searchResults, setSearchResults] = useState<IBlog[]>([]);
    const [error, setError] = useState("");

    const handleSearch = async (event: FormEvent<HTMLFormElement>) => {
        event.preventDefault();

        if (!searchTerm) {
            setError("No search term entered");
            setTimeout(() => {
                setError("");
            }, 3000);
            return;
        }
        setIsSearching(true);

        // coz 2 or more words seem to be treated as an exact match
        const preparedDBSearchString = searchTerm.split(" ").join(" or ");

        const res = await searchSupabase(preparedDBSearchString);

        if (res.length === 0) {
            setSearchTerm("");
            setIsSearching(false);
            setError("No search results found");

            setTimeout(() => {
                setError("");
            }, 3000);
            return;
        }

        setSearchTerm("");
        setIsSearching(false);
        setSearchResults(res);
    };

    return (
        <div className="flex flex-col mb-8 ">
            <form onSubmit={handleSearch} className="flex gap-3">
                {searchResults.length > 0 && (
                    <Dialog setSearchResults={setSearchResults}>
                        {searchResults.map((res: IBlog, index: number) => (
                            <Card key={index} cardInfo={res} isInDialog={true} />
                        ))}
                    </Dialog>
                )}
                <input
                    type="text"
                    placeholder="search..."
                    name="search"
                    value={searchTerm}
                    onChange={(e) => setSearchTerm(e.target.value)}
                    className="rounded-sm p-2 bg-inherit md:w-96 border focus:border-brand-accent focus:outline-brand-accent focus:outline-none"
                />
                <button type="submit" className="btn-primary my-0 md:w-32">
                    {isSearching ? "Searching..." : "Search"}
                </button>
            </form>
            <span className=" text-red-300 font-medium mt-1">{error}</span>
        </div>
    );
};

export default Search;
This creates a form with a search input, some local state to hold input value and gives the user some feedback. It also calls a function that performs a full text search on the title and markdown columns against the user-generated search term. Finally, it merges the two results and sets the searchResults state.
Taking a closer look at the logic here, const preparedDBSearchString = searchTerm.split(" ").join(" or ");, the searchTerm was not sent directly to the searchSupabase function. It had to be prepared.
Create a supabase.ts file in the queries folder and define the searchSupabase function as below:
import { supabaseClient } from "@/lib/supabaseClient";
import { IBlog } from "@/types";

export const searchSupabase = async (preparedDBSearchString: string) => {
    const { data, error } = await supabaseClient
        .from("blogs")
        .select()
        .textSearch("title", preparedDBSearchString, {
            type: "websearch",
            config: "english",
        });

    const { data: mdData, error: mdError } = await supabaseClient
        .from("blogs")
        .select()
        .textSearch("markdown", preparedDBSearchString, {
            type: "websearch",
            config: "english",
        });

    const combinedSearchResults = [...data!, ...mdData!] as IBlog[];

    return combinedSearchResults;
};
This is because many times users will insert multiple words and the text search default is to treat search strings as exact matches. This is not ideal, it is better if the text search treats the search string as a rough match. In this case, this is achieved by adding "or" between each word of the search string then passing the result of this to the text search function.
The search component opens a dialog when it has search results, you will need to add a new file in components called dialog.tsx and paste the following in it:
import { AiFillCloseCircle } from "react-icons/ai";
import { ReactNode, useState } from "react";
import { IBlog } from "./Card";

interface DialogProps {
    setSearchResults?: (blogs: IBlog[]) => void;
    children: ReactNode;
}

function Dialog({ setSearchResults, children }: DialogProps) {
    const [isOpen, setIsOpen] = useState(true);

    const closeModal = () => {
        if (setSearchResults) setSearchResults([]);
        setIsOpen(false);
    };
    return (
        <dialog
            open={isOpen}
            id="modal"
            className={`${
                isOpen ? "opacity-100" : "opacity-0 pointer-events-none"
            }  flex flex-col items-center justify-center bg-inherit transition-opacity duration-300 ease-in-out fixed inset-0 backdrop-filter backdrop-blur-md backdrop-brightness-50 w-4/6 border border-container rounded-md max-h-[80vh] text-white p-4`}
        >
            <button
                onClick={closeModal}
                className="flex flex-row gap-2 items-center justify-center ml-auto font-medium hover:text-red-300 my-4"
            >
                <span>Close</span>
                <AiFillCloseCircle height={25} />
            </button>
            <div className="max-h-[80vh] overflow-auto w-11/12 mb-6 ">{children}</div>
        </dialog>
    );
}

export default Dialog;
This dialog takes a setter function and children as props, handles its open/close state and displays some markup.
Going back to the page.tsx file in the app folder, add the <Search/> component right below the h1 and above the div like so:
    Thoughts on the tech I'm using, learning and loving{" "}
            </h1>
            <Search />

            <div className="card-section w-8/12">
                {edges.map(({ node }: { node: IBlog }, index: number) => (
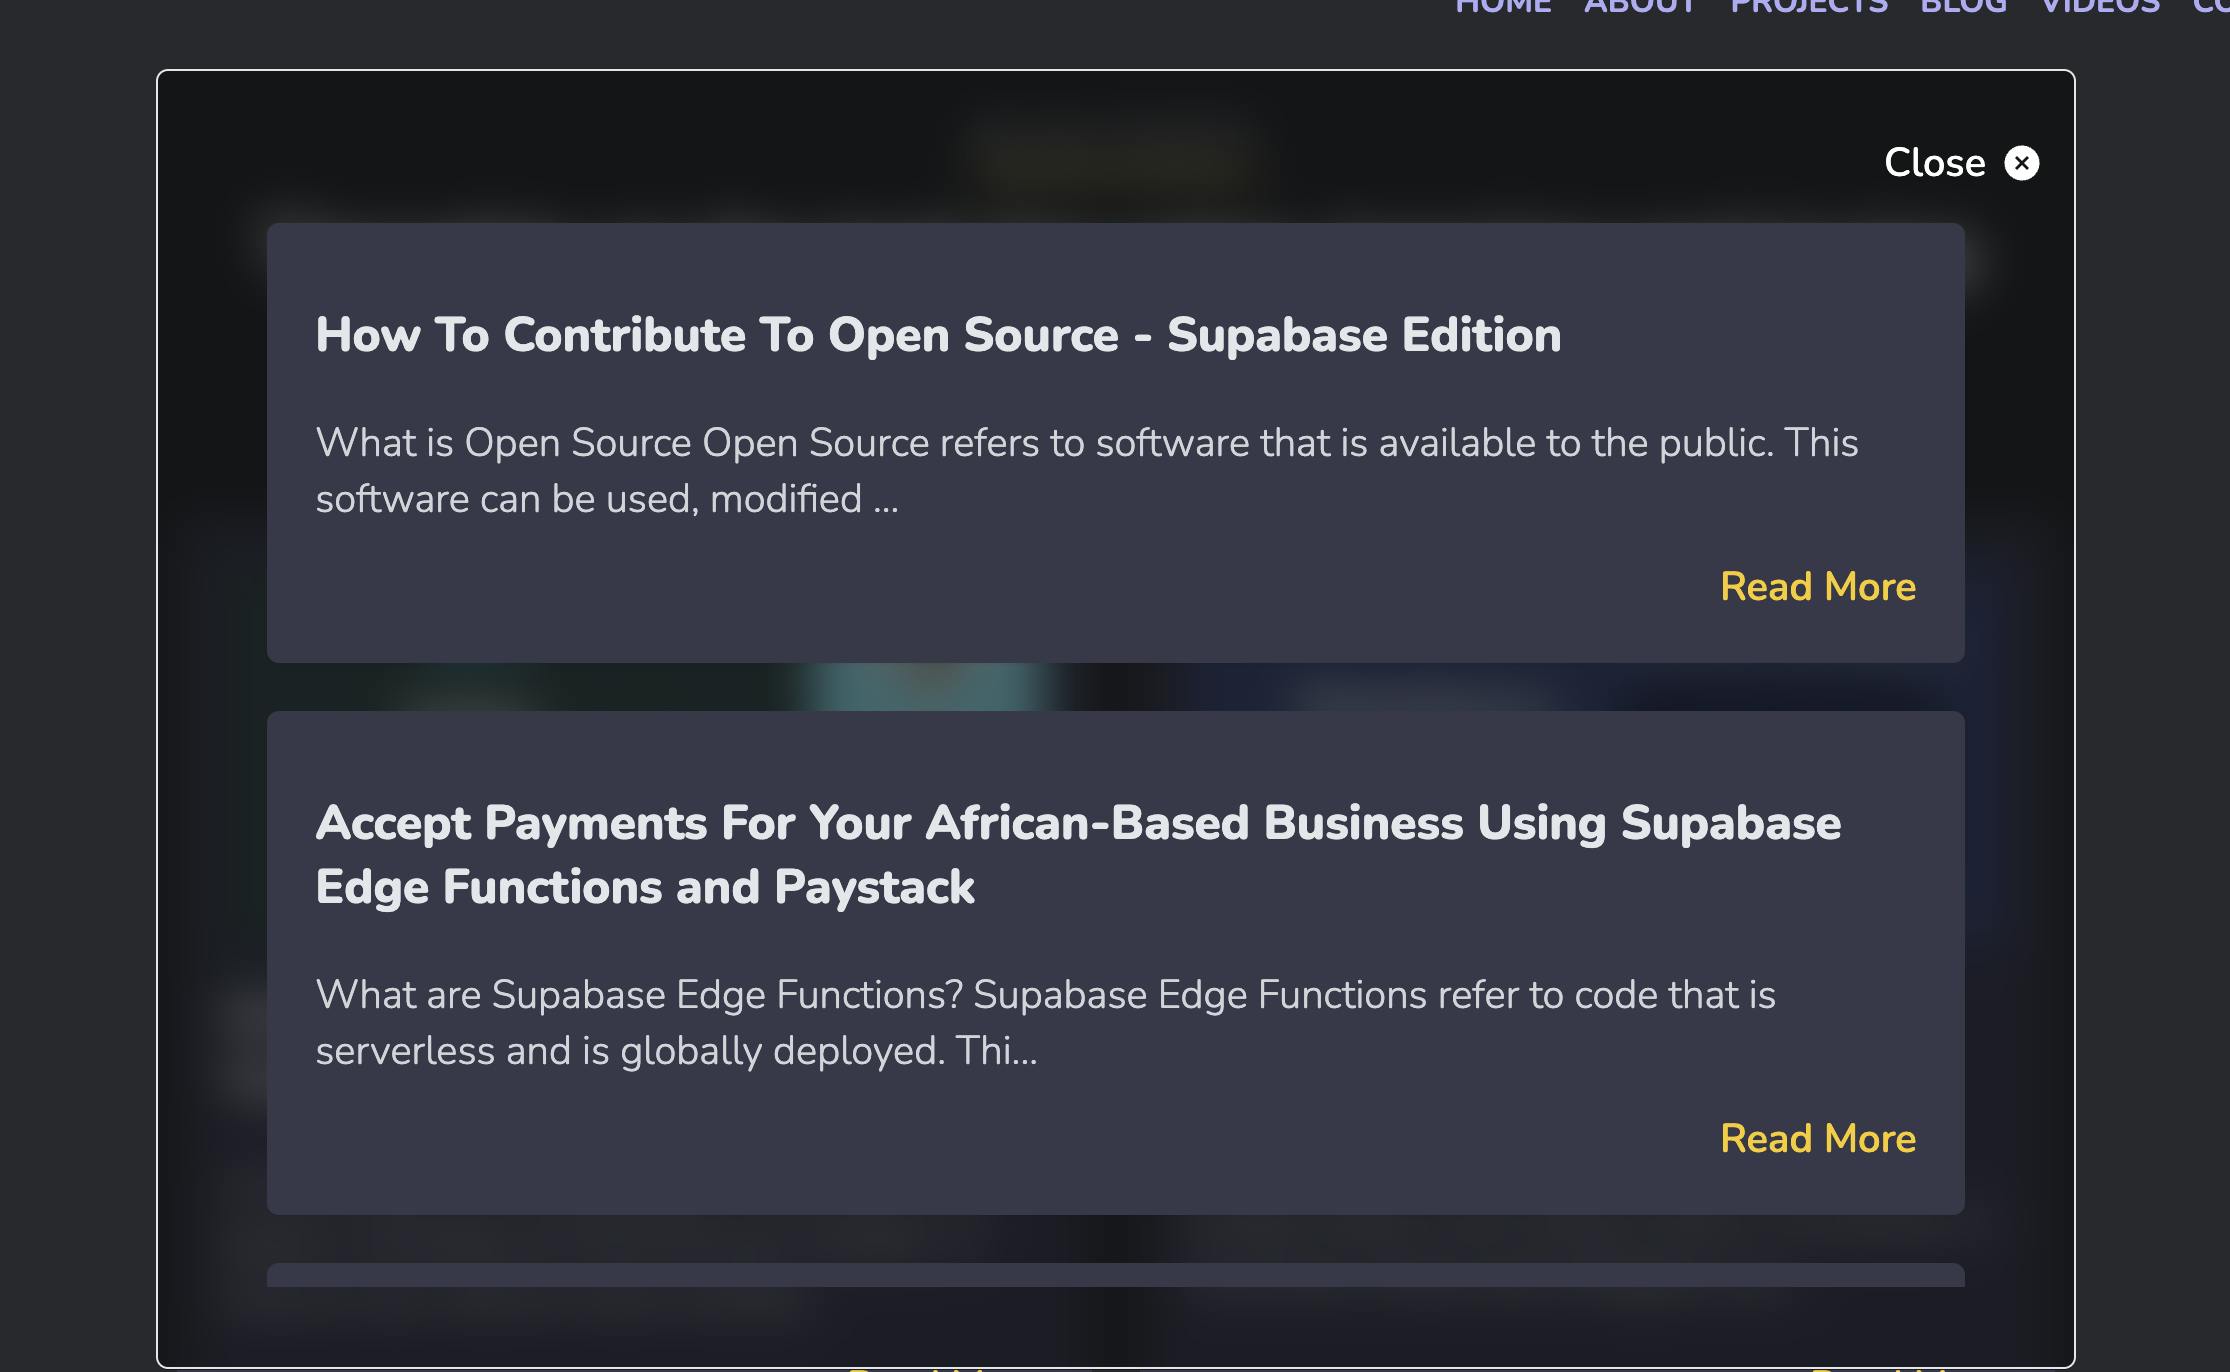
You now ready to test out the search functionality. This is how the implementation looks on my site:


Handling Blog Changes with Hashnode Webhooks
Search now works but Supabase is searching against the initial posts, what happens when you update or delete a blog? Or even publish a new blog? So far, Supabase has no way of reacting to this changes meaning that soon your search results will not be on par with your latest Hashnode blogs.
To fix that, you need to configure webhooks so Hashnode can alert your blog application whenever you update, delete or publish a blog. Then you need to add some logic that keep Supabase in sync with these events.
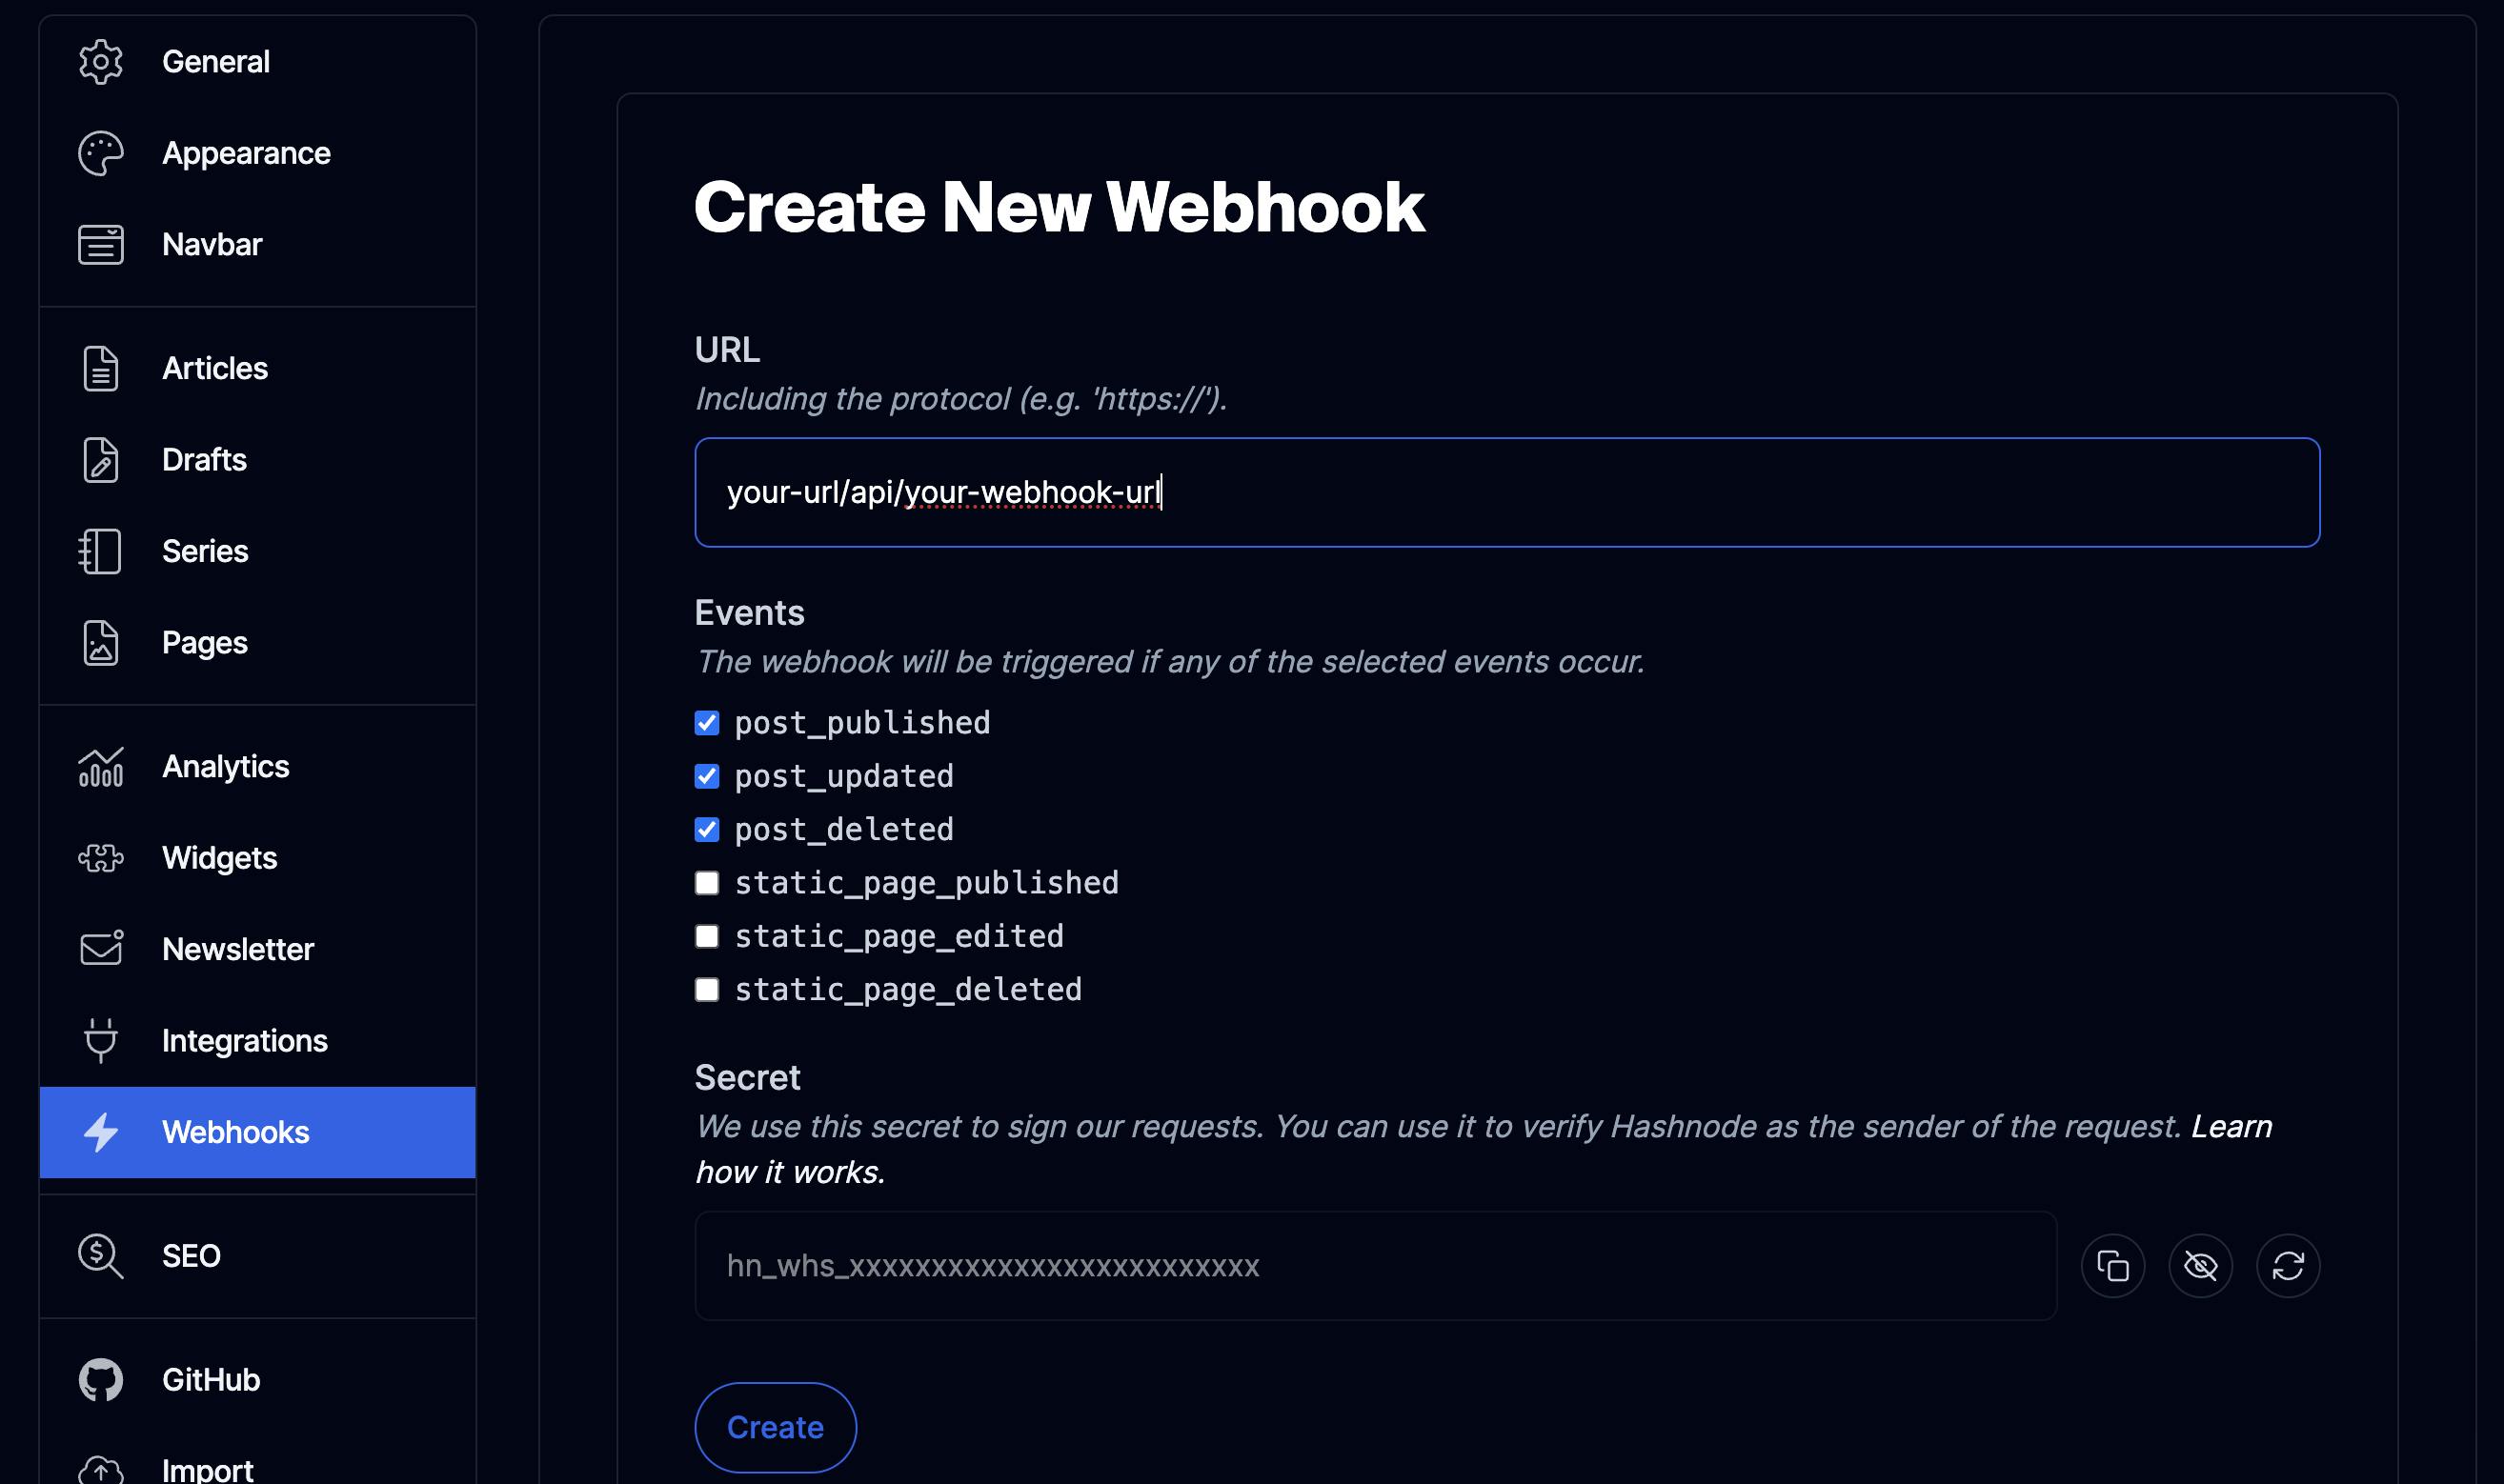
In your Hashnode dashboard, scroll down to webhooks and click on "Add a New Webhook", fill in the information like so then click "Create".

Back in your Next.js app, create an api folder within the app folder. Then create a new folder within api and give it the same name as the last part of the URL you put when creating the webhook above.

Create a route.ts file and paste the following into it:
import { supabaseServerClient } from "@/lib/supabase";
import { getBlogQuery, getClient } from "@/queries/gql";
import { NextResponse } from "next/server";

enum EventType {
    PostDeleted = "post_deleted",
    PostPublished = "post_published",
    PostUpdated = "post_updated",
}
export async function POST(req: Request) {
    console.log("Hashnode Webhook Received");

    const {
        data: {
            post: { id },
            eventType,
        },
    } = await req.json();

    if (eventType === EventType.PostUpdated) {

    } else if (eventType === EventType.PostDeleted) {

    } else {

    }
}
The code above defines an enum for the event types coming Hashnode and exports a function. The function logs when that api route is hit, pulls out the id and the event type from the incoming Hashnode event and has conditional statements depending on the event type received.
Starting with the update event, the application needs to retrieve the matching blog details from the Hashnode API by the post id then update that blog by the hashnode_id column in the Supabase table. Add the following code to the first if statement:
    if (eventType === EventType.PostUpdated) {
        console.log("New Post Update Event");

        const variables = { id };

        const {
            data: {
                post: {
                    title,
                    subtitle,
                    brief,
                    slug,
                    coverImage: { url },
                    content: { html, markdown },
                },
            },
        } = await getClient().query({ query: getBlogQuery, variables });

        console.log("Successfully fetched new blog from hashnode");

        const { error: updatedError } = await supabaseServerClient
            .from("blogs")
            .update({
                title,
                subtitle,
                brief,
                slug,
                url,
                html,
                markdown,
            })
            .eq("hashnode_id", id);

        if (updatedError) {
            console.error("Error updating post", updatedError.message);
            return NextResponse.json({
                status: 500,
                statusText: "Error updating post",
                error: updatedError.message,
            });
        }

        console.log("Successfully updated blog in db");

        return NextResponse.json({ status: 200, statusText: "Post updated" });
}
Moving onto the delete event, the application has to pass the post id from the Hashnode API to Supabase so Supabase can delete the blog that has a matching hashnode_id. Paste the following in the second if statement:
 else if (eventType === EventType.PostDeleted) {
        console.log("New Post Delete Event");

        const { error } = await supabaseServerClient
            .from("blogs")
            .delete()
            .eq("hashnode_id", id);

        if (error) {
            console.log("Error deleting post", error.message);
            return NextResponse.json({
                status: 500,
                statusText: "Error deleting post",
                error: error.message,
            });
        }

        console.log("Successfully deleted blog in db");

        return NextResponse.json({
            status: 200,
            statusText: "Post successfully deleted",
        });
    }
To handle the publish event, the application needs to fetch the blog details from the Hashnode API then pass it to Supabase so that it can insert into the table the new post. Paste this into the last else statement:
else {
        console.log("New Post Publish Event");

        const variables = { id };

        const {
            data: {
                post: {
                    title,
                    subtitle,
                    brief,
                    slug,
                    coverImage: { url },
                    content: { html, markdown },
                },
            },
        } = await getClient().query({ query: getBlogQuery, variables });

        console.log("Successfully retrieved newly published blog from hashnode");

        const { error: publishError } = await supabaseServerClient
            .from("blogs")
            .insert({
                title,
                subtitle,
                brief,
                slug,
                url,
                html,
                markdown,
                hashnode_id: id,
            });

        if (publishError) {
            console.error("Error updating post", publishError.message);
            return NextResponse.json({
                status: 500,
                statusText: "Error updating post",
                error: publishError.message,
            });
        }

        console.log("Successfully added newly published blog to the db");

        return NextResponse.json({
            status: 200,
            statusText: "Post added to the db",
        });
    }
Now to define the getBlogQuery, go the gql.ts file in the queries folder and paste the following code at the end of the file:
export const getBlogQuery = gql`
    query GetBlog($id: ID!) {
        post(id: $id) {
            slug
            title
            subtitle
            brief
            content {
                html
                markdown
            }
            coverImage {
                url
            }
        }
    }
`;
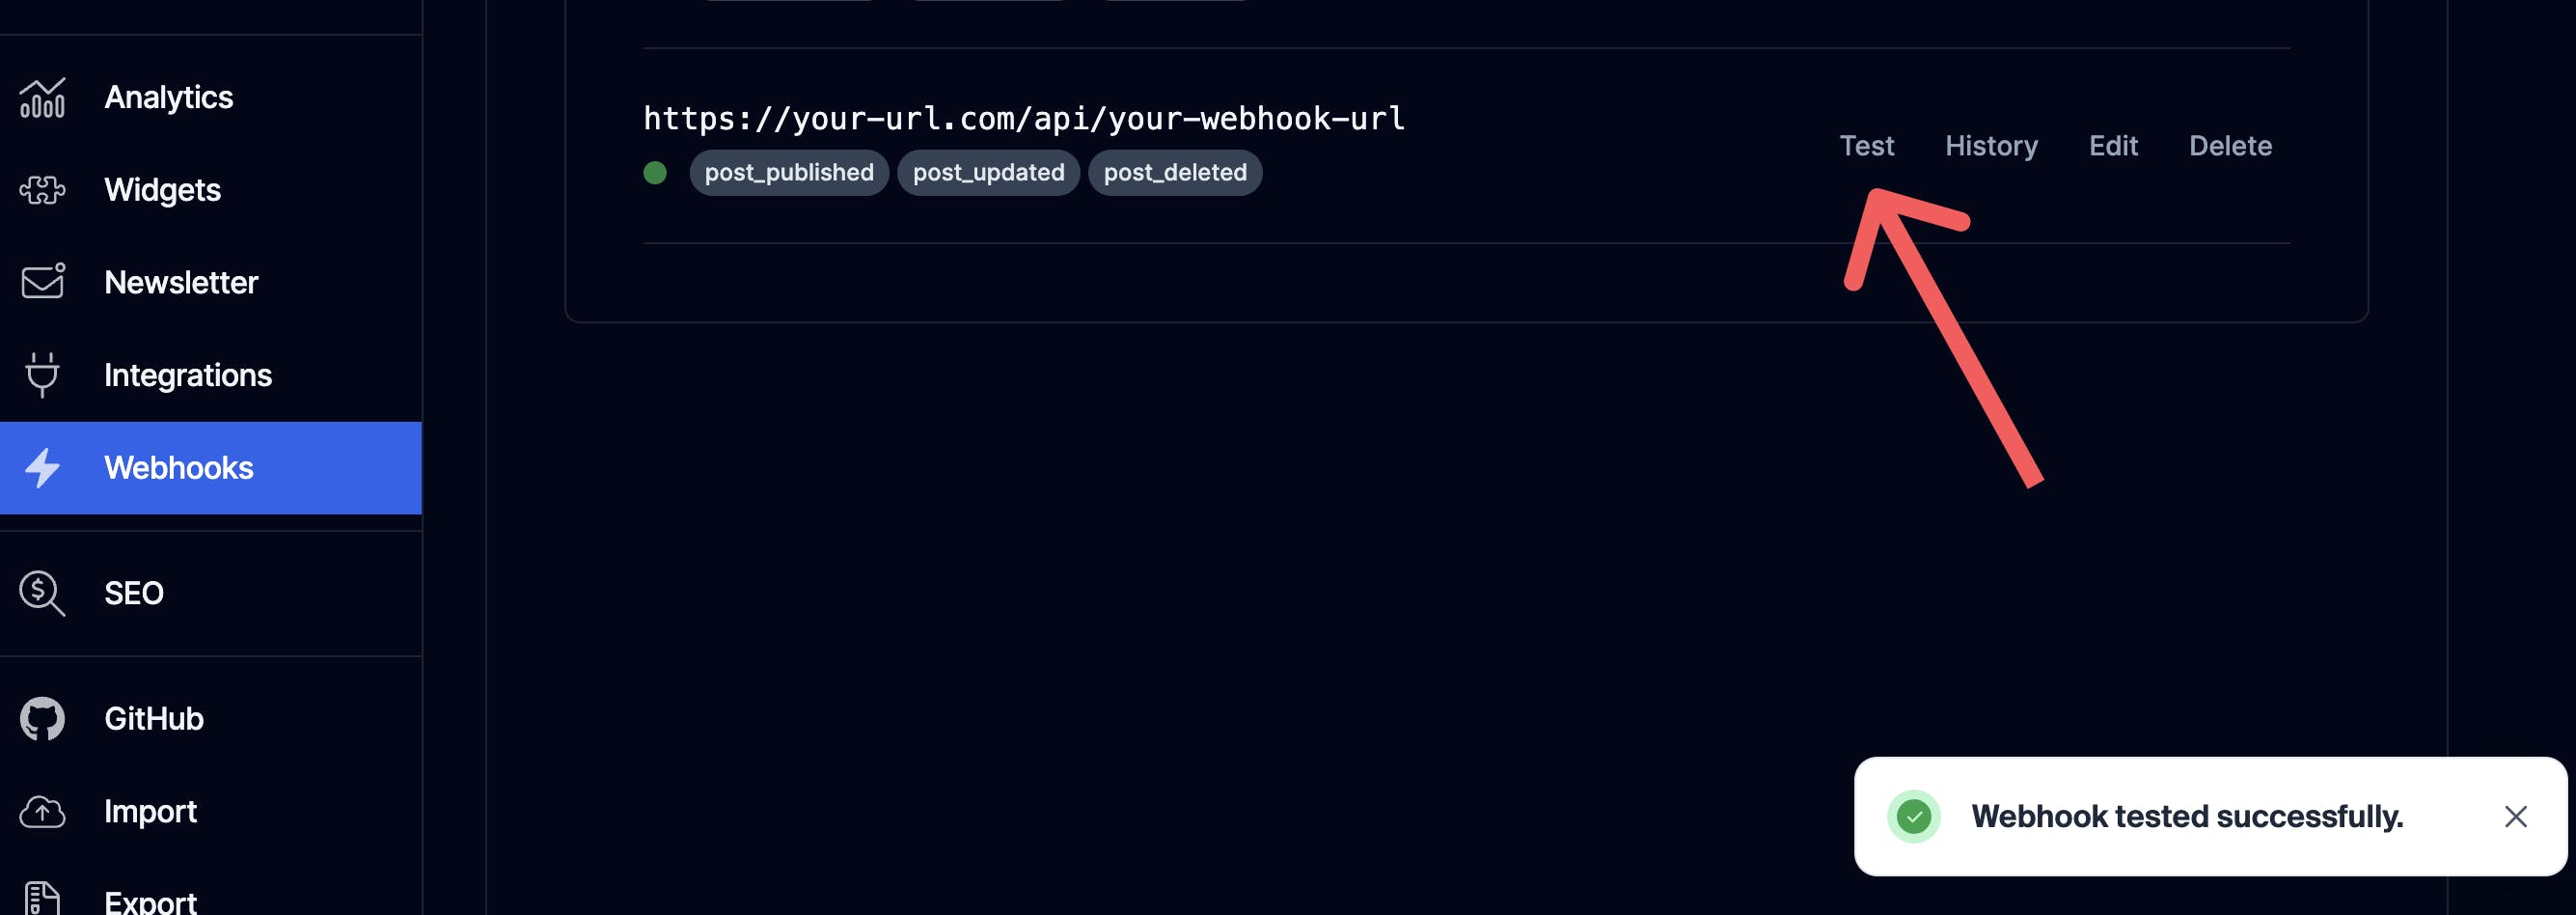
Lastly, you need to test the webhook. Go back to the webhook section of the Hashnode dashboard and click the test button. You should a success message if there is no issue. You can also see the history of all invocations by clicking on the history tab

Notes on Semantic Search and Hybrid Search
This blog went through the process of adding search functionality using Supabase full text search, which uses keyword matches. There are two other types of search that can be implemented using Supabase.
The first is semantic search, this type takes into account the potential intent and the context of a user's query when carrying out the search. It is more accurate and is better suited to searching through very large volumes of data.
The quickest way to get started with this is via AI (Artificial Intelligence) models. This has been simplified in Supabase launch week 11 and you can learn more about it here.
The second way is through hybrid search. Essentially, this leverages both full text search and semantic search. It offers the best of both worlds and you can read more about it here.
Additional Resources
Here are some resources that are useful:
Disclaimer:*I'm yet to completely move to headless hashnode. At the time of writing, clicking on my blog posts will redirect back to a subdomain.*
